This will delete the page "Quick-Start-Guide". Please be certain.
Starfive VisionFive2 SBC Quick Start Guide
1. Prerequisite
Before compiling EDK2 and EDK2-Platform code ensure you perform the following steps:
Create a project folder name “vf2_uefi”
> mkdir vf2_uefiSetup environment
export GCC5_RISCV64_PREFIX= <RISCV_tool_chain>
export PACKAGES_PATH=<project_path>/vf2_uefi/edk2:<project_path>/vf2_uefi/edk2-platforms
export EDK_TOOLS_PATH=<project_path>/vf2_uefi/riscv-edk2/BaseTools
_ - version 10.0.2_
Download U-Boot SPL, Linux, and SD Card images from here.
Refer here documentation for detail instruction to generate linux.iso
Git clones the code
> cd <project_path>/vf2_uefi
> git clone https://github.com/starfive-tech/edk2
> git clone https://github.com/starfive-tech/edk2-platforms
Checkout Starfive VisionFive2 EDK2 tag
> cd edk2
> git submodule update --init
> cd ..
Checkout Starfive VisionFive2 EDK2-Platform tag
> cd edk2-platforms > git submodule update --init > cd ..Setup and clean the project
> cd edk2
> source ./edksetup.sh
> make -C ./BaseTools clean
> make -C ./BaseTools
> make -C ./BaseTools/Source/C
> source ./edksetup.sh BaseTools
> cd ..
Build UEFI image
> build -a RISCV64 -t GCC5 -p <project_path>/vf2_uefi/edk2-platforms/Platform/StarFive/JH7110SeriesPkg/JH7110Board/JH7110.dscBuild image is located in ../Build/JH7110/DEBUG_GCC5/FV/JH7110.fd
- Download Tera Term with this link
- Setup Tera Term:
- Set board to boot from SD Card or eMMC or QSPI Flash
- Power up the board
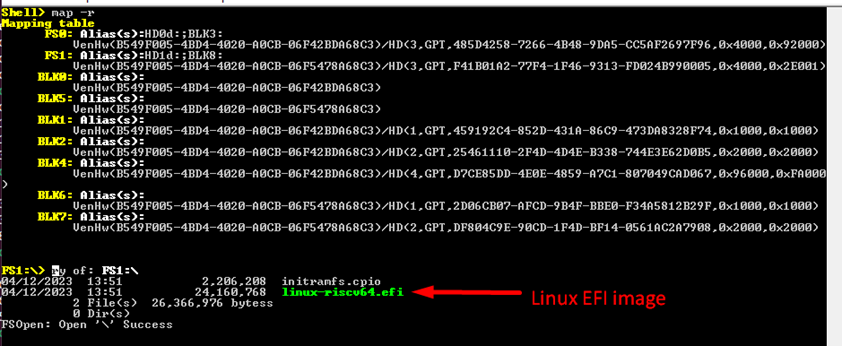
List all and read mapped partitions in SD Card, eMMC and QSPI Flash
> map -r
> FS0:
> ls
Result:
Select a device that contains the Linux EFI image in UEFI Shell:
> FS1:
> ls
Note: FS1 is just an example. You may select other devices FS* that contains the image as well.
Load initramfs
> initrd initramfs.cpioLoad and run the Linux EFI image
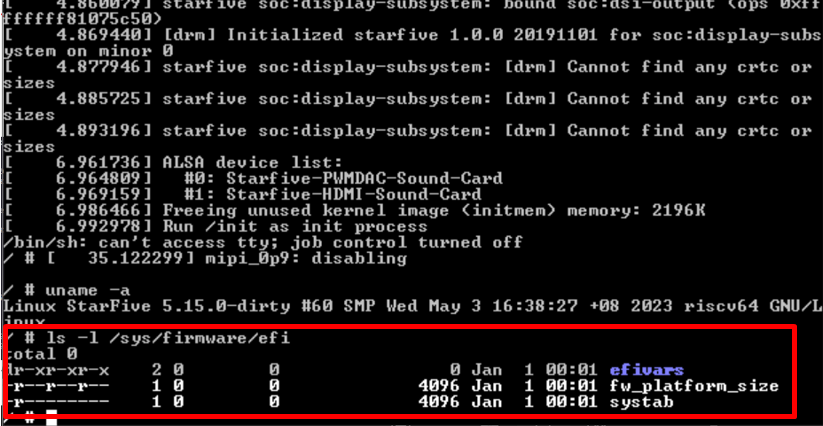
> linux-riscv64.efi console=tty1 console=ttyS0,115200 debug rootwait earlycon=sbiVerify that Linux is booting from UEFI
> root
> ls -l /sys/firmware/efi
Refer here documentation for detail instruction to generate u-boot-spl.bin.normal.out
2. Clone Starfive VisionFive2 EDK2 and EDK2-Platform code
Perform the following steps to download the codes:
3. Building EDK2 and EDK2-Platform code
Perform the following the clean-up and build the code:
4. Flash image into SD Card
Please refer to the guide here
5. Flash image into eMMC (optional)
Please refer to the guide here
6. Flash image into QSPI flash (optional)
Please refer to the guide here
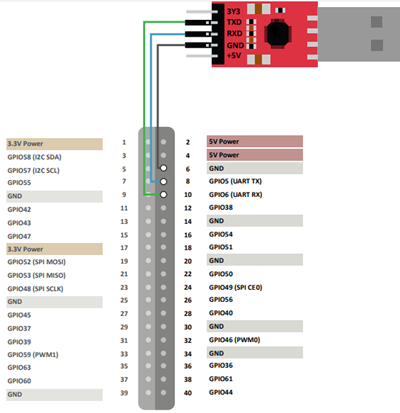
7. Connect FTDI to Starfive VisionFive2 board
Connect the jumper wire between the USB-to-Serial converter and the Debug pins of VisionFive 2 40-pin GPIO header. The following figure is an example:
8. Start TeraTerm
9. Booting into UEFI Shell in Starfive VisionFive2 board
Note: If booting from eMMC, hold the reset button for more than 3 seconds to reset the board.
10. Booting into Linux in Starfive VisionFive2 board manually
Linux auto-boot can be enabled by creating a startup.nsh file based on the guide here
Result:
Result:


